
Walk into any drugstore or up to any makeup counter and you'll soon see so many types of makeup brushes, you'll start wondering which ones are absolutely necessary, which ones are just nice to have, and which ones can complete which tasks. For the makeup lover, it's like being a kid in a candy store. Learn what each brush is used for and you'll be able to complete your makeup kit like a pro.
Must Have Makeup Brushes
These are the first brushes to pick up when you're building your beginner kit. They'll get the most basic makeup jobs done. From there, you can branch out depending on the effects you're going for.
Eyes
- Medium Flat Shader: The medium flat shader brush has flat sides and a slightly rounded tip. It's large enough to rest comfortably against your eyelid, below the crease, and just small enough to maneuver within that area to pat color on one-third of your lid at a time (in case you want a gradient effect from the inner to outer corner). Never sweep the brush back and forth across the lid. Pat it to keep the color visible and avoid shadow fallout all over your cheeks. The edge of this brush can be used to shade the lower lash line, too. Make sure you get bristles that are stiff enough to pat the product onto your lid, but soft enough not to hurt your skin.

- Fluffy Domed Brush: These bristles will need to be a bit more flexible than those on the shader brush, and the domed tip will ensure that you can get the color right into your crease, then diffuse the color outward and upward. You'll use this with a windshield wiper motion along the shape of your crease, so be sure you get one with soft bristles to avoid scratching. You can also use the tip of this one to dot a light-reflecting shade at the inner corner of each eye for an eye-brightening effect.

- Large Flat Shader: The large flat shader brush is just a bit bigger than the medium shader. This one is perfect if you're doing a single shade over most of your lid and into the crease. If you have a lot of space between your eyebrow and crease, you can also use this to apply your highlight color (which gives the eyes a lifted look and brings out the shape of your brows). You'll want the same stiff, dense bristles necessary in the medium flat shader brush, too.

- Liner Brush: These are usually thin brushes with stiff bristles and a pointed tip. Sometimes the handle of the brush (or the metal section, the ferrule), is bent. Some people find this makes application easier. Liner brushes can be used with dark shadows, but they really shine when used with gel liners. Dip the brush into the jar, get a small amount of product, and then lay the side of the bristles along your lashes and drag across. You can use the precise point to get the liner on the innermost corners and to draw the tail in a cat-eye line.

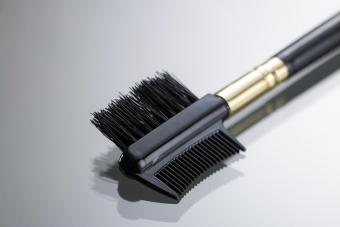
- Brow/Lash Brush and Comb Combo: You can't walk out with marvelously applied makeup paired with unruly brows and clumpy lashes! A brow/lash brush and comb combo will allow you to smooth your brows into place and comb through any clumps. One side will look like a toothbrush (for brows) while the other will look like a fine-toothed comb (for lashes).
Face
- Blush Brush: This is for basic powder blush. You'll want a medium-sized, slightly domed tip with bristles that bend when you press on them (so not too stiff) but don't splay out. A lot of the brushes that come with drugstore blushes are too small, too stiff (or not stiff enough to stand up to the pressure of applying product to your cheeks, depending on the brand), and too flat, so use those only when you have no choice. Test these out on your skin before you buy if you can, making sure that the bristles aren't scratchy and feel good on your face. You can use this brush to apply color to the apples of your cheeks, bronzer to the temples, nose, cheeks, and chin, or your highlighting shade along your cheekbones.

- Contouring Brush: If you like to contour your face for more a more angular appearance, to slim down your cheeks, or to minimize your forehead, you may prefer to have a contouring brush that's separate from your blush brush. For those who contour daily or several times per week, this brush is a must-have. This is similar in size, density, and stiffness to the blush brush but instead of an even dome, the bristles are cut at an angle to really get into the contours of the cheeks. Once you've gathered product, you'll set the brush against your face with the longest bristles toward the ear and the shorter bristles further down the cheeks at a diagonal. Drag the brush down toward the corner of the mouth, then (without picking up more product) flick your wrist down along the line you made to fade the color down and get rid of any obvious lines. Go up and down the line as many times as necessary to diffuse the color.

Brushes That Are Nice to Have
Once you've had a chance to try out the necessities, you can experiment with these brushes as well. Adding them to your kit will allow you to try even more makeup looks with ease.
Eyes
- Angled Brow Brush: You can use this type of brush to apply shadow or cream to your brows. These look like small, thin paintbrushes with their bristles cut at an angle. The shape makes it easier to make those quick, check mark strokes through the brows for a natural finish. You can also use this to apply powder or cream/gel eyeliner along the lash line. Start with the longest bristles at the outer corner of the eye and make short strokes inward. You can also position it so that the outer edge of the liner is flicked upward before dragging it down and across the lid from the outer corner to the inner one, making a cat eye effect almost effortless.

- Pencil Brush/Dense Domed Brush: The pencil brush serves two purposes: precise shading along the outer corner of the upper lid for when you want to deepen the color at the outer edge of the crease and down to the lash line, and shading the lower lash line (especially if you're doing a smoky eye). This brush almost looks like it has a domed shape, but there's a point in the middle that makes it easy to get a very precise application. The bristles are typically dense since they're intended to keep the color confined to a very specific area.

- Mascara Fan Brush: This looks like a tiny fan made of bristles at the end of a handle. It's usually about as wide as the average eye, and it can be used to apply a light layer of mascara along the lashes (especially lower).

Face
- Foundation Brush: In most cases, using your fingers or an inexpensive sponge from the drugstore to apply liquid foundation will suffice. However, a foundation brush can feel luxurious and take the application to the next level. You can choose from a flat brush with densely packed bristles to use like a paintbrush (make short strokes from top to bottom of the face) or a large stippling brush to dab the foundation and work it across your face in circular motions for a flawless finish. The flat brush will usually give you heavier coverage than the stippling brush.

- Small Stippling Brush: A smaller stippling brush is perfect for applying liquid or cream blushes. It can even be used to apply highly pigmented pressed or baked mineral blushes. Dot the product onto your cheeks and swirl.

- Large Powder Brush: The surface area of this brush is large and the bristles are about a medium density, meaning you can distribute powder evenly over your face to set your makeup without it looking cakey. Simply dip the brush into the loose or pressed powder, tap it to remove excess product, and then brush over your face, working from the forehead down. In most cases, the bristles form a domed shape.

- Kabuki: This is similar to the large powder brush though its bristles are more densely packed. It is used to apply powder foundations that are meant to add coverage, not simply set makeup. The bristles also form a domed shape in most cases (flat-top kabukis do exist, however, and offer heavy coverage). To use a kabuki brush, swirl the brush on the product, then swirl it across the skin using a buffing motion. This is a must-have if you've found that you prefer to wear mineral foundation almost every day.

Lips
- Lip Brush: A lip brush is nice to have, especially if you tend to wear bold lip shades. You can line your lips and then fill in the middle with the lipstick of your choice. Simply swipe the brush down the side of your lipstick and "paint" your lips. The difference in precision between applying straight from the tube and using a lip brush is astounding. These are typically made up of densely packed synthetic bristles in either a flat brush form or a pointed tip.

Which Bristles to Choose
In general, synthetic bristles are best for cream products while natural bristles do best with powders. There are some brushes, called duo fiber brushes, that can easily work with cream, liquid, or powder products. These typically look as if the base of the bristles are simply black and the tips white, but they're actually a mix of synthetic and natural materials. An example of this would be the MAC 130 Short Duo Fiber Brush.
Brushes to Suit Your Needs
Everyone's must-have and nice-to-have lists will look a little different. It really depends on the type of makeup you wear every day, from the type of formulas to how detailed you need your makeup looks to be. Take a look at the type of makeup you wear on a daily basis and compare it to the list above to decide what you need to fill in the gaps in your collection.


